Features of installing transom wheels on a PVC boat
A PVC boat is much better than the old rubber models - almost everyone knows this. However, it is not always possible to manage the craft itself in its pure form. It is quite common to install transom wheels on a PVC boat, and it is important to know how this procedure is carried out.
Why is this needed?
Launching a boat into the water and pushing it back to shore can be quite difficult. This sometimes causes difficulties in strong, physically developed people. Often there are boats that, with a length of 3.6 m and the installation of a motor, “pull” 100 kg. And this is without taking into account fuel, without taking into account the transported cargo, catch or hunting prey. You can, of course, involve an assistant in the business, but this does not always work out, and why, when there is an excellent way out - the installation of special wheels.
But you can still somehow reconcile with the severity. But it is undesirable to put up with excessive friction. When a boat is dragged over rocks when landing on an unequipped shore, it will inevitably be covered with scratches. And maybe even cut a little. Yes, modern materials allow the design to endure such events without any special consequences.
However, if they are repeated systematically, nothing will be able to withstand the resulting load; the solution to the problem is the same - fixing the transom wheels on the boat.

Operating Instructions
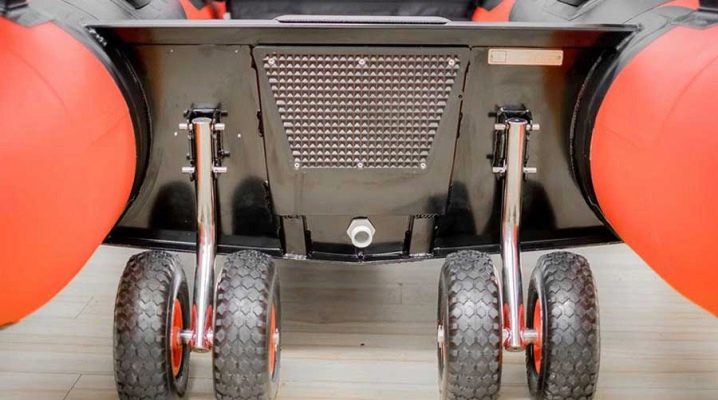
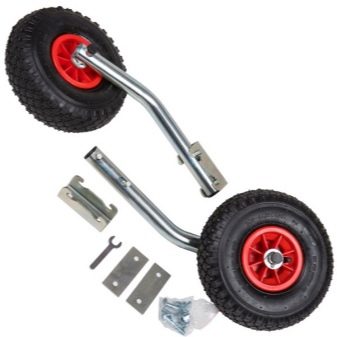
There are quite a few different transom wheels.But in any case, their axis should be pushed forward relative to the plane of the transom. Then the axis is as close as possible to the center of gravity of the craft. Therefore, the load is distributed most evenly. Other requirements are:
- from the bottom of the transom to the wheel rim must be at least 2 cm;
- from the lower border of the transom to the base of the bracket attached to it - at least 0.5 cm;
- the gap between the inside of the cylinders and the wheel must be at least 0.1 cm (otherwise the wheels, rising, will touch the cylinder);
- installation must be done on the outside with respect to the rack in order to eliminate interference with the motor;
- wheels are placed strictly vertically;
- the bracket and rack are chosen so that they fit into the design of the boat.

Before installation work, you must first carefully study the instructions for the vessel and recommendations for installation. For work you will need:
- building level;
- electric drill with 4 and 10 mm wood drills;
- screwdriver;
- keys;
- silicone-based sealant;
- marker;
- pencil.
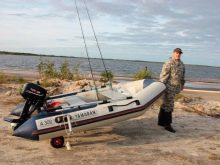
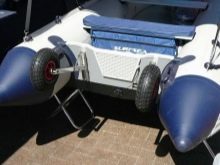
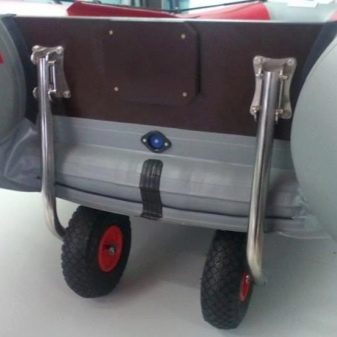
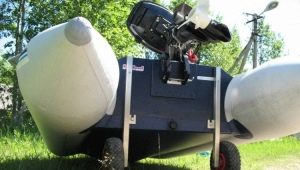
To correctly install the wheels on the transom, you must first pump up the boat itself. On a solder boat, it is allowed not to connect all the solders, but to limit yourself to inflating any compartments, with the exception of the keel. When the boat is inflated, it should be fixed on stands with a height of at least 0.4 and no more than 0.5 m. This size was not chosen by chance - it allows the mounted wheels to pass without problems from the bottom edge of the transom to the surface. How exactly to attach the wheel racks to the transom, you need to decide by examining the design of these racks and the appearance of the transom itself.
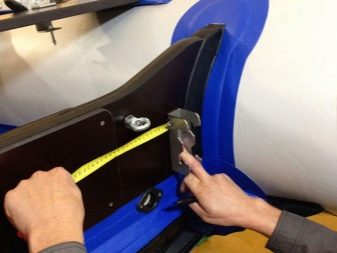
In terms of ease of use, the best choice is the use of reclining removable movers, attached through a special bracket. To attach to it, a bolt is used that replaces the axle. Around this axis, the rack rises or is placed in the working position. If you decide to attach the wheels with your own hands exactly according to this scheme, then they start by marking the place where the bracket is to be installed. Counting is carried out from the inner section of the cylinder.
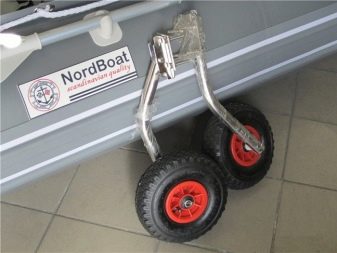
A vertical line 8.5–9 cm long is drawn to the middle of the transom. Where it intersects with the lower edge of the transom, they stop and measure at least 0.5 cm, and ideally 1-1.5 cm. Next, draw a horizontal line to the middle transom. The next step is to assemble the bracket and wheel stand. Having connected them, they try on the assembly near the markup. If the lines are on the right, then you need to apply the right wheel (and vice versa).
When trying on, carefully look at exactly how the edges of the bracket are located in relation to the marking lines. They must match exactly. Holding the bracket with one hand, look to see if the wheel touches the surface of the transom and the inside of the tank. The smallest allowable gap is 2 cm.
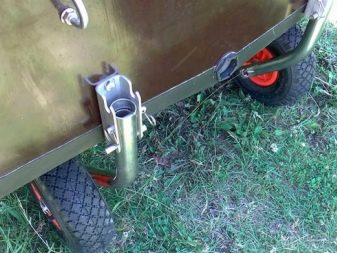
If this condition is met, you need to remember this location of the bracket and mark with a marker the points where the fastening will be done.
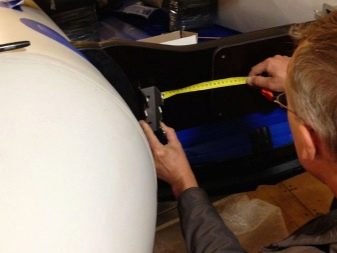
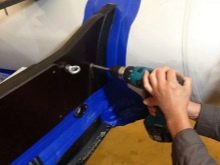
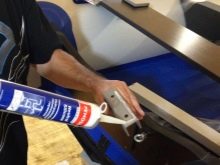
The necessary places so that you can put fasteners are drilled twice: with a slightly smaller drill and with a drill whose diameter is equal to the diameter of the bolt. It is advised during the second pass not to punch the last millimeters, but to drill a hole from the opposite side. Then the transom will not split when the drill comes out of it. After drilling, the holes are coated with a silicone-based sealant.Otherwise, the transom will become damp and rot; It is also recommended to use a sealant to treat the bolts and the inside of the washers.
The brackets are fixed by removing them from the racks in advance. These parts are finally connected when the brackets are set rigidly. You should evaluate how efficient the wheels are in various positions. If this is not done immediately, it will be possible to face serious troubles during operation. But, of course, the scheme just described is not suitable for all boats.

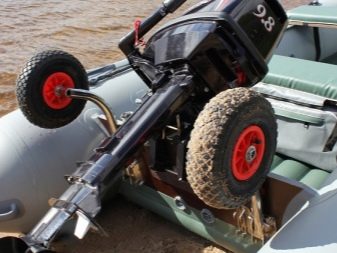
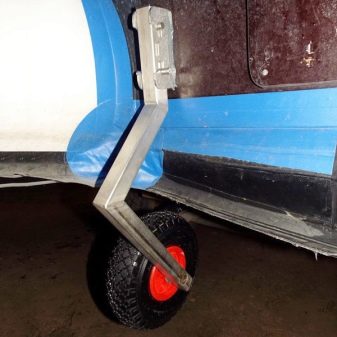
Transom wheels on boats with NDND are set differently. An example of such a design are boats from the Solar company. Their transom is located above the inflatable bottom. At the bottom, the entire part of the bottom, located between the cylinders, is covered with a PVC apron. This solution allows for easy access to the glidepath. Therefore, it is necessary to use transom wheels of a special type. They should have a longer stand, and the structure itself should be curved.
However, there is an alternative solution - mounting the rack at a certain angle to the transom. If you put the structure straight, the apron can bend, and its work is disrupted. When marking, it is necessary to take into account the thickness of the inflated bottom. On a panel and on a regular boat, it is equally possible to put sometimes wheels with an elongated straight rack.
However, you will have to increase the distance separating the bracket from the transom, due to plywood or textolite spacers, as well as long bolts.
Work with the Kasatka boat has its own characteristics. It is characterized by increased deadrise and has a soldered bottom. Departing from the bottom of the transom, the bracket is fixed so that the fasteners are above the internal holders of the floorboard.In this case, the bottom of the bracket should not be parallel to the edge of the transom, but horizontally. At the Viking boat, due to its lower deadrise than the Kasatka, the brackets are also placed above the solder stops.
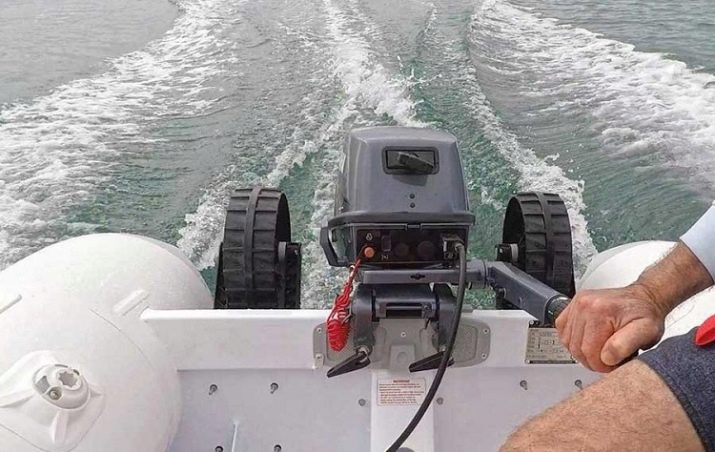
It is necessary to take into account a few more subtleties and nuances. So, spreading the transom wheels as wide as possible, they simplify the transportation of the boat. But at the same time, you need to make sure in advance whether the wheels will touch the cylinders when they are raised to a non-working position. You should also check to see if they will prevent the outboard motor from turning while riding. It is worth taking care of the strict parallelism of the wheels in relation to each other. Only with such an arrangement will it be easy to move the craft on the ground.

In addition, the violation of the parallelism of the wheels leads to their rapid deterioration during use. You can eliminate errors when drilling holes using the building level. You need to punch holes only with a special drill (the so-called pen). Punching holes with a drill for metal leads to tearing out pieces of plywood and damage to the appearance of the transom. It is also recommended to check that the drill itself will not be damaged and will not break anything.
The axes of all mounting holes are located at an angle of 90 degrees to the planes of the transoms. Under this condition, a snug fit of washers and bolt heads is ensured. When screwing nuts onto bolts, they must not be over-tightened on the first try. Let there be a sequential tightening - it will help to uniformly distribute the load between the joints.
And the last point - if something raises doubts, questions, you should immediately seek the advice of professionals.
Basic schemes
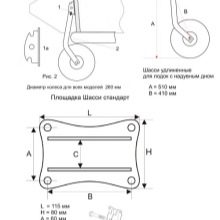
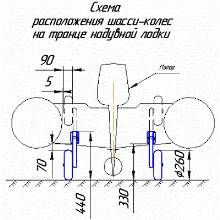
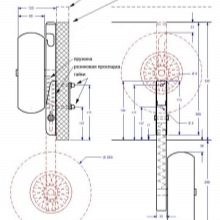
The drawing below shows how to properly mount the wheels on the transom of a small boat (from 2.7 to 3.3 m). It is assumed that 1 wheel is mounted on the rack. As a result, it will be possible to move the craft over a fairly long distance without any fatigue. It is noted that the smaller the boat, the cooler the result looks. And the next photo clearly shows how the wheels should be mounted on ships with a conventional base and using an extended chassis.
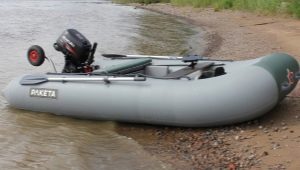
In the next video, you will install transom wheels and glasses on the Rocket PVC boat.


Explanatory roller. Clearly, without "water", accessible to anyone for understanding. Thank you.