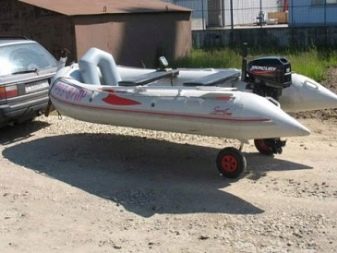
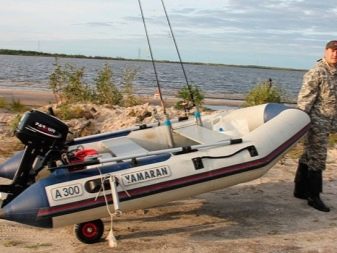
How to make wheels for boats with your own hands?
The main advantage of rubber boats is their extreme lightness. They are the best suited for transportation over short distances from the summer cottage to the reservoir. However, in the event that a motor is already attached to the boat, and the cockpit is filled with fishing tackle, it will be quite difficult to move the unit. Transom wheels make this process as easy as possible, and for skilled fishermen it will not be difficult to make them yourself.
Primary requirements
It is not difficult to buy ready-made transom wheels for transportation - you can often find them in an ordinary fishing store. The main disadvantage in this case is the unreasonably high cost. Transom wheels for boats made of PVC with NDND, which will be used only for transporting the unit to the reservoir and back, will cost the fisherman a tidy sum of 5,000 rubles.
Due to the high cost of these parts, indispensable for quick transportation, many fishermen are interested in how to make homemade wheels for a rubber boat with their own hands.
In the circle of fishing enthusiasts, this topic never loses its relevance, regularly generating new ways to create transom elements for an inflatable boat.
You need to understand that when making wheels yourself, in order to avoid collapse of the structure, certain requirements must be observed.
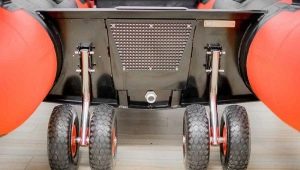
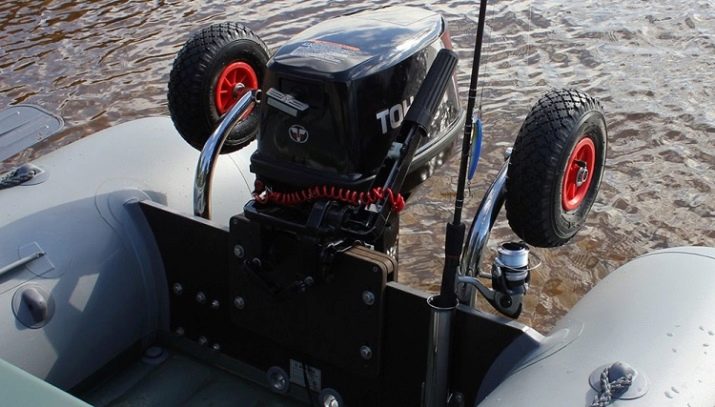
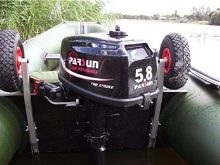
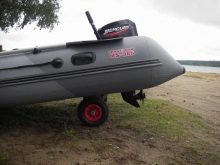
- The axis of the transom wheels should be installed as close as possible to the center of gravity.
- To reduce the effort that will be applied during transportation, it is worth setting the bend of the rack towards the bow of the boat, and not vice versa.
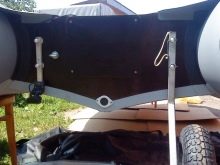
- It is mandatory to leave a gap between the bottom of the boat and the edge of the wheels, which should not be less than two centimeters. This avoids clogging of parts with dirt and facilitates the cleaning process.
- When choosing materials, it is worth considering the conditions for further operation. This includes taking into account the level of humidity in the area, regular exposure to moisture, as well as serious temperature changes. As a rule, preference is given to stainless steel, aluminum, galvanized iron or ordinary rolled products.
- The greater the distance between the wheels, the more stable the overall structure of the boat will be.
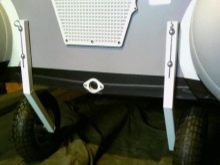
- Transom wheels should be installed in a strictly vertical position.
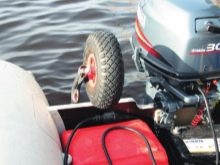
- The wheel stand should not be facing towards the motor - it should be placed facing the cylinder.
Don't forget that all materials and fasteners must be made of stainless steel. Of course, the use of elements made of ordinary metal is also allowed, however, in this case, you will have to spend money on waterproof varnish or paint.
For this reason, you should not save on fastening - it is better to immediately purchase slightly more expensive materials than to spend time and money on their additional processing in the future.
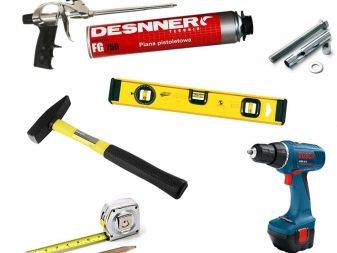
Tools and materials
Tools and materials for the manufacture of transom wheels should be purchased at the preparatory stage. This is a very important process, where it is better to get a little more elements “in reserve” than to feel the grave consequences of an unreliably assembled structure later. No one will rejoice at the loss of tackle or a rich catch due to the breakdown of a boat fastened to the wheels with an insufficient number of bolts.
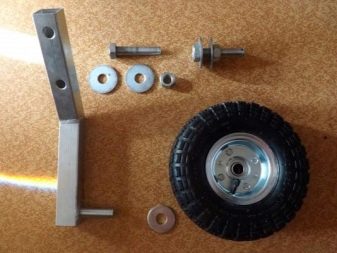
A set of mandatory tools and materials for installing transom wheels on a boat.
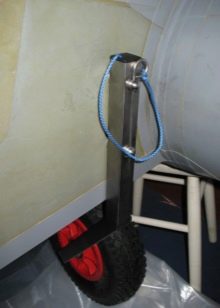
- Two wheels with a diameter of at least 30 centimeters, and a girth of about 5-8 centimeters.
- High quality hacksaw for cutting metal.
- Electric drill and a set of drills.
- Screwdriver, pliers and wrenches.
- Nuts, cotter pins, bolts and washers. It is better to prepare a couple of pieces more, in reserve.
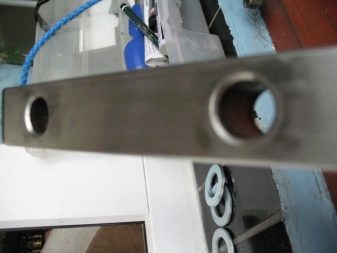
- Square profile with a cross section of about 2 centimeters.
- Comparable to the diameter of the mounts tube.
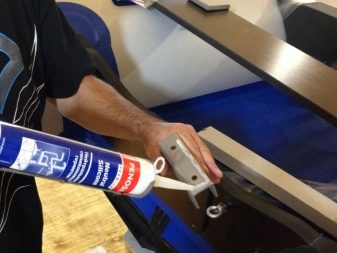
- Waterproof silicone based sealant.
- Welding equipment.
- Marker, pen, pencil or any other writing instrument for making marks.
A quick glance at the list of required materials can be a little intimidating, but it's not all that scary. The main thing is to follow the instructions during work, be as careful as possible and securely fasten all the details. The final result will be worth the effort, because a homemade product, no matter how hard you try to fork out for high-quality bolts, will be much cheaper than a ready-made purchase option.
It is worth bearing in mind that for the construction, stainless steel parts would be the best option. They are slightly more expensive than standard ones, however, the nature of the work to be done and the constant proximity of the boat to the water obliges them to be used.


Manufacturing
Having decided to make transom wheels with your own hands, it will be useful to draw up a short action plan in advance. You will also need to prepare all the drawings of the vehicle, which will indicate the dimensions of the elements used. A properly assembled and fastened boat will be able to withstand weight up to 150 kilograms.
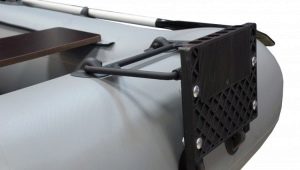
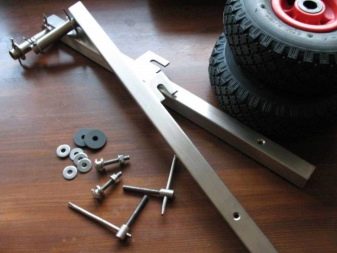
The following guides are focused on creating a vehicle that will be used to move one person up to a kilometer. For installation, 4 bolts are used, which are attached to the plywood transom. In the future, it is permissible to change the height of the installed fastener using a special stud, for which it will be enough to unscrew the nut on the side of the structure.
As a rule, during the manufacture of transom wheels, one of the two following methods or a combination of them is used.
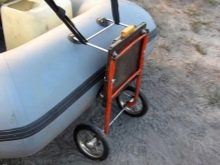
You can make wheels without drilling a transom according to the following plan.
- Choosing the best place to install a square profile. It is necessary to ensure that the installed structure does not interfere with the operation of the engine.
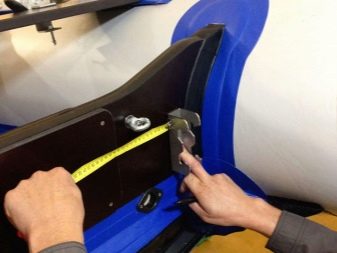
- It is required to measure the radius of the wheels and add 5 centimeters. This is the distance from the edge of the transom where the wheels will be mounted. It is believed that the indicator obtained in this way is optimal for self-propelled structures.
- The bracket will preferably be placed at a right angle. This will ensure the strength of the device, which will be able to withstand significant loads.
It is worth bearing in mind that The main difference between the two methods provided is that, following the second method, the wheels are placed under the bottom of the boat. This is a little more difficult to do, however, when using a scheme of this kind, nothing will interfere with the operation of the outboard engine.
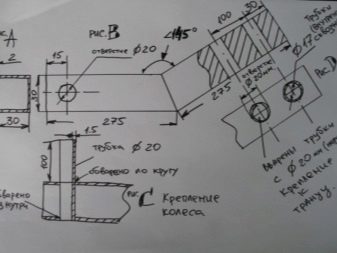
Plan for the manufacture of wheels using a drill and welding equipment.
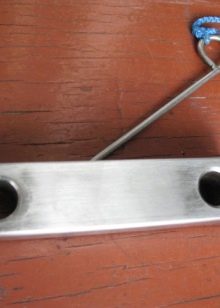
- It is required to cut 4 pieces of the length required for the structure from a profile prepared in advance. Next, you need to attach the received elements to the lower profile area.
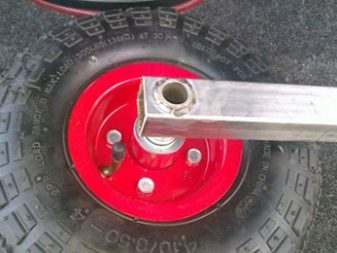
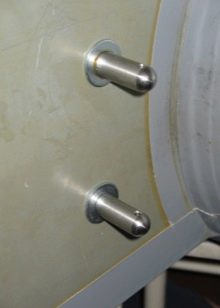
- To fix the rings in the tubes, you need to drill several through holes. A nut prepared in advance in size is also welded inside the tube. This is necessary so that there is some distance between the fastener and the structure.
- To isolate the inside of the system from possible ingress of moisture, rubber or plastic quick-release plugs are attached from the outside.
- On the front bow, you need to drill a few holes that will be needed to mount the chassis to the transom.
- Next, both fasteners need to be welded together at an angle of about 45 degrees. If necessary, the edges must be adjusted.
- After carrying out all of the above steps, the chassis must be secured with tubes using nuts and washers.
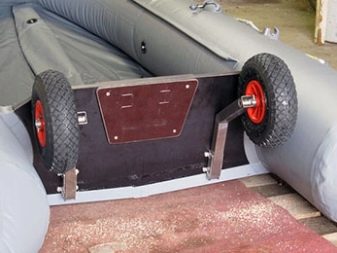
Upon completion of all the above actions, the boat with transom quick-release wheels will be ready for operation. If desired, you can carry out additional cosmetic actions, for example, paint the device or purchase special stickers for it.
Helpful Tips
The main and undoubted plus of homemade transom wheels is significant cost savings. Another advantage - the ability to fully customize the system to fit your needs, because owners of boats of non-standard sizes often experience difficulties while searching for optimal wheels. By deciding to do everything yourself, you can easily get rid of this problem.It is enough to make all the exact measurements, after which it will not be difficult to design an ideal transportation system.
A significant part of the recommendations regarding the independent manufacture of transom wheels is inextricably linked to the methods of fastening.
- Do not neglect pencil marks. This greatly simplifies the process. For example, when the mount is placed on the transom, special marks can be made on the holes, and then holes of the desired size can be drilled.
- Bolts are more reasonable to put from the inside of the boat. In this case, the nuts will be on the front side.
- Washers, nuts and bolts should be used to fasten the transom wheels.
- Important notes can be made using sheets of durable materials such as aluminum or textolite, on which holes are drilled. After that, the sheet must be applied to the inside of the transom and all holes must be marked.
- Also, do not overload the boat with excess cargo. Even well-built structures don't always make it - they're modified rubber boats, not cargo lifts, after all.
- After each fishing, you need to thoroughly rinse the boat from stuck dirt and algae. After drying, it will be useful to treat all metal elements with grease.

The further operation of a boat with transom wheels has its own nuances, which should not be forgotten either. Despite the relatively strong nature of the design, it is impossible to use the boat as a trailer for a car in any case. Such an undertaking will almost certainly end in failure, and a huge number of hours spent on creating the system will be wasted.
You should carefully consider the use of the boat after it has been stored folded for a long time, for example, in the cold season.
It will be useful to remove all the racks and lubricate the threads with special grease. It is best to buy products that do not destroy the rubber structure.
In the next video, you will find the manufacture of transom wheels with your own hands.